Most of my progress since returning to my belove Quiltopia has been on my Carefree Highways quilt– I have a November deadline to enter it into the brand new, New England AQS show which I already have hotel reservations for (thank you, Lainey!) and for which I would love to have a piece in the show.

So this post is all about Carefree Highways, although I’m going to start with a Flying Geese tutorial that most of you would be interested in– we need 200 of ’em for our quilt! The Flying Goose is a simple looking unit which I have often had trouble with. (But not as much trouble as the square in a square block, which is actually two flying geese. 🙂
First, let’s discuss all the ways of making them! I bought paper piecing papers for this job, but I have a limited amount of fabric. I’m convinced paper piecing was devised by fabric manufacturers to make sure you use more. I’ve also made them larger and cut down with those Bloc Loc grooved rulers — probably the best method for me, except again, I’m low on fabric, so I can’t start with more. Don’t even suggest the four at a time method– I’ve already completely messed those up many, many times. I’m using the stitch ‘n flip method with no upsizing because in the end I figured, “Why not just learn to make the dang block?”
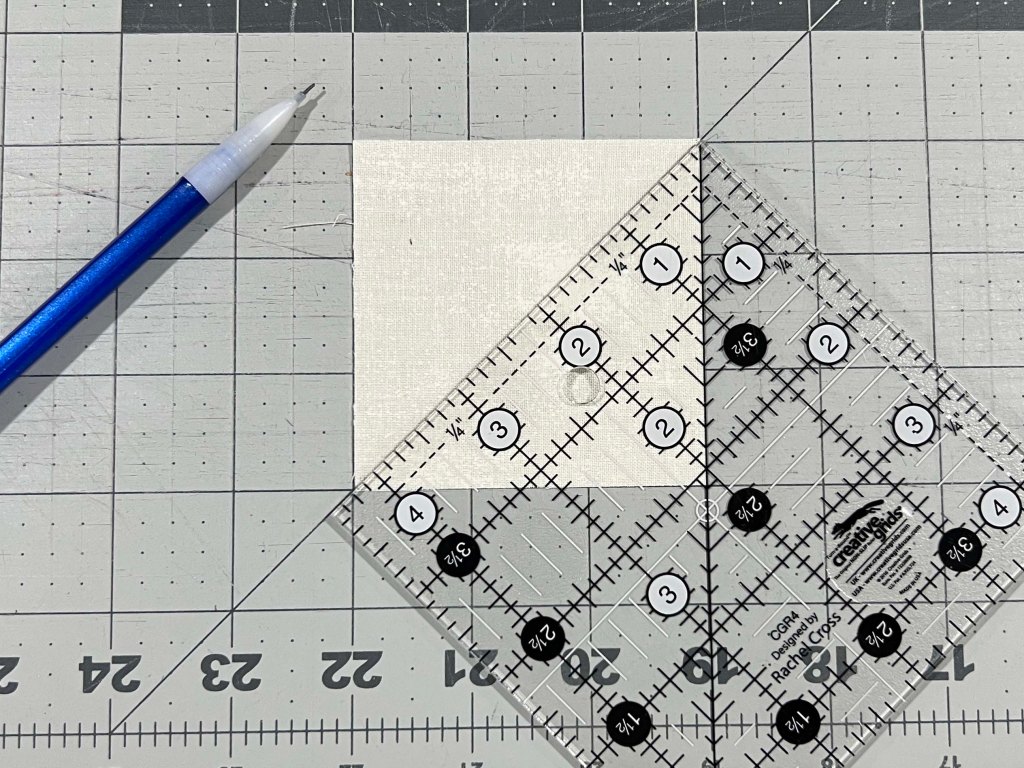
First, cut your pieces to exactly the right size– Carefree Highways uses a 3″ x 5-1/2″ base block and a 3″ squares. Accuracy is everything, so I’m drawing a line across the squares, as usual, and you can see I use my mat and ruler to make sure the angle is perfect. You need two squares per block, obviously or not.
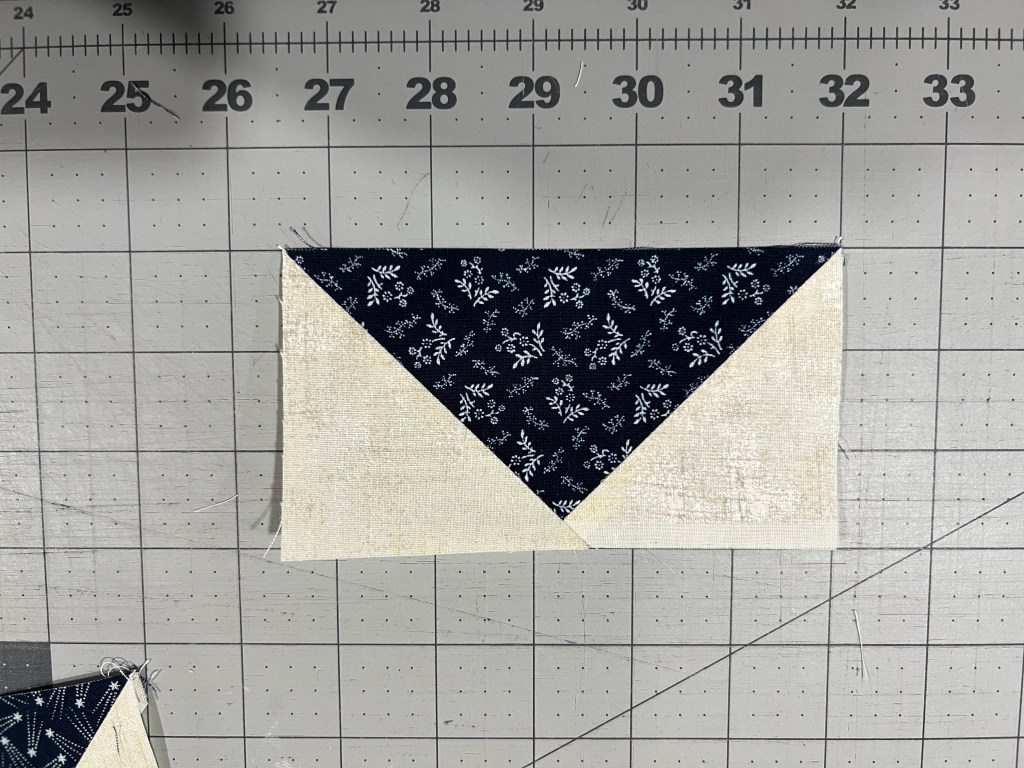
Now we line up our first square right sides together on one side of the base patch. I even pin them together at times, if things seem slippy. Here I am sewing on my second side– because I forgot to take a picture of the first one– sorry! The most important thing is– SEW RIGHT ON THE LINE. I was taught to sew a hairsbreadth to the seam side to allow for the turning of cloth, but this has not helped me with flying geese and seems to throw things out of whack elsewhere.

Press your seam, then flip the corner out until it matches the outside edges of the base piece; press it in place. Resist all temptation to press it open or there goes your chance for beautiful stitching in the ditch to show off your star points and preserve them for all eternity.

Fold the square back to expose the seam line and now trim off to a 1/4″seam. You can also stitch another 1/4″ seam on that excess piece and easily get some nifty, albeit tiny, HSTS for another project– I hope to God I don’t do this as I don’t need another box of pieces looking at me like they want to be made into something. So I’m throwing mine out right away.

Now add the second patch on the other side in the same way– here is your finished unit. Three things to check– the point is 1/4″ away from the cut edge of the patch, and the seam on both sides come out exactly in the corner. Yay!
Now it’s time to sew your goose into the quilt– I’m following my master layout diagram which you should have if you are making Carefree Highways quilt– it’s available on the website on the Carefree Highways page.

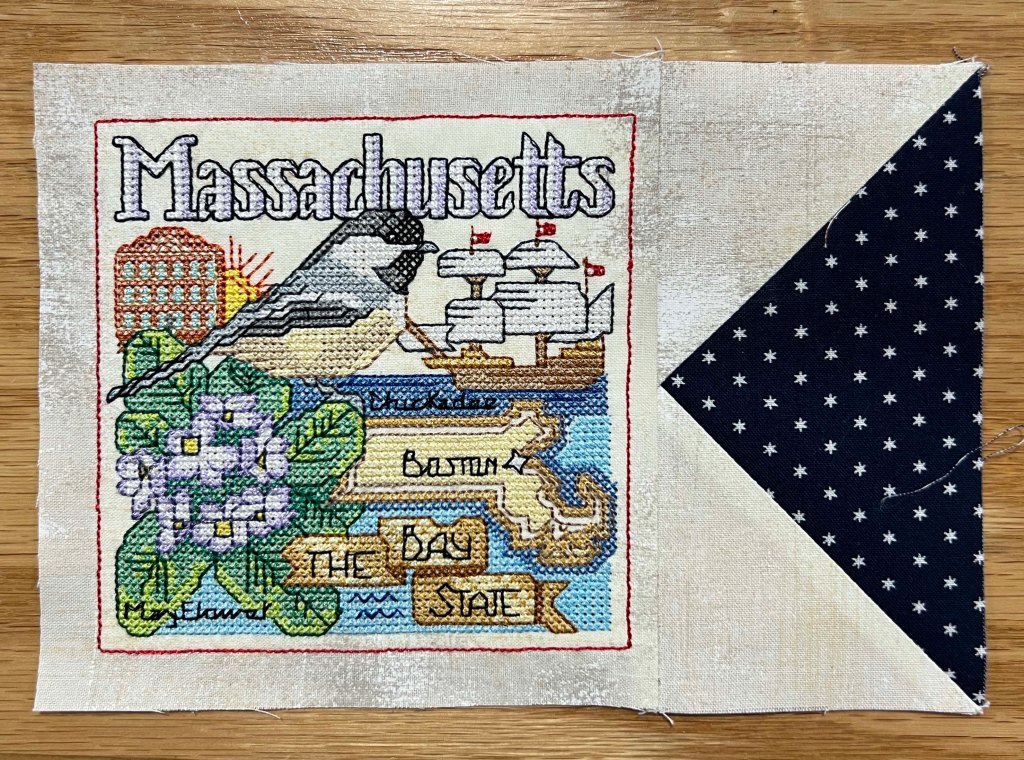
Pin, pin, pin! Precisely line up your flying goose over its neighboring piece, right sides together. Now, usually, I would sew on the goose side so I can sew right over that X where the point is, but in this case, we’re also trying to line up the seam with a red embroidered line on the other piece, so in this case, I’m stitching with the embroidery on top. I have my 1/4″ foot with a guide on the edge that is just perfect for this– you can see the guide on the edge of both pieces, but you can also see the other edge of the foot is conveniently lining up with my red line, so I can insure I’m stitching it very straight. If you foot doesn’t do this, just take a look at where on your foot that red embroidered line is, and keep it there for the whole seam.

Here is my finished join– pretty nice, huh! Check your point and check that your red embroidered line is perfectly parallel to the seam. Only 199 bottles of beer to go and we’ll have a king size quilt!
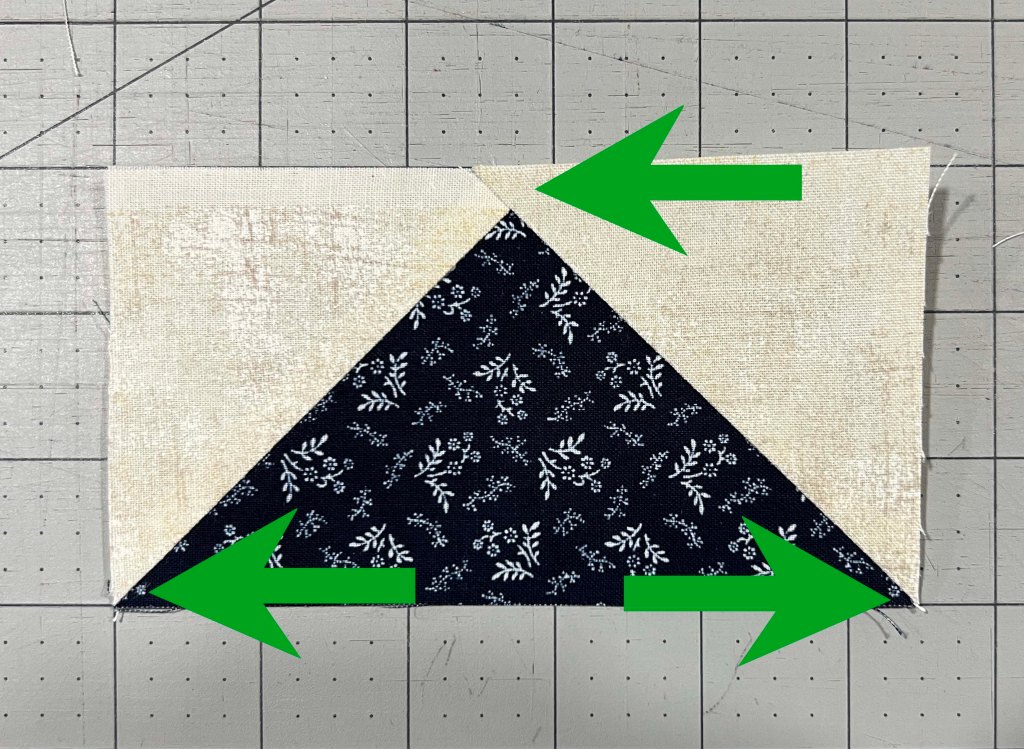
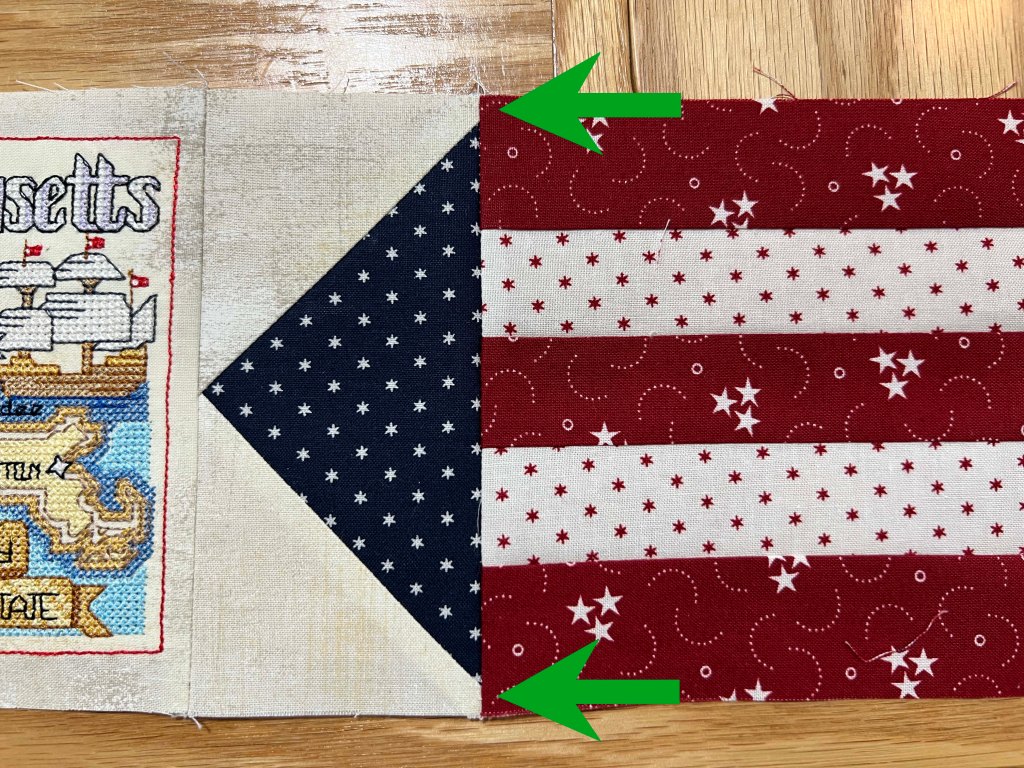
On the other side of the goose, it’s easy to stitch to the next unit– no points, right? When you finish, you do want to make sure the other two points on this triangle are 1/4″ away from the cut edge, as shown by the green arrows. I am 100% sure you will get the same results if you just take you time and follow these directions!
So that’s how I’m making my flying geese, twenty at a time. Of course, it would be most efficient to make all 200 at once– my temperament just makes that impossible. I’m stitching one row at a time and I will be sewing the rows together as I go– it helps my motivation to see the quilt progress. I’ll finish this second row tonight and here is my finished first row.

Now, here’s some “Carefree Highways” only information for those of you stitching along.
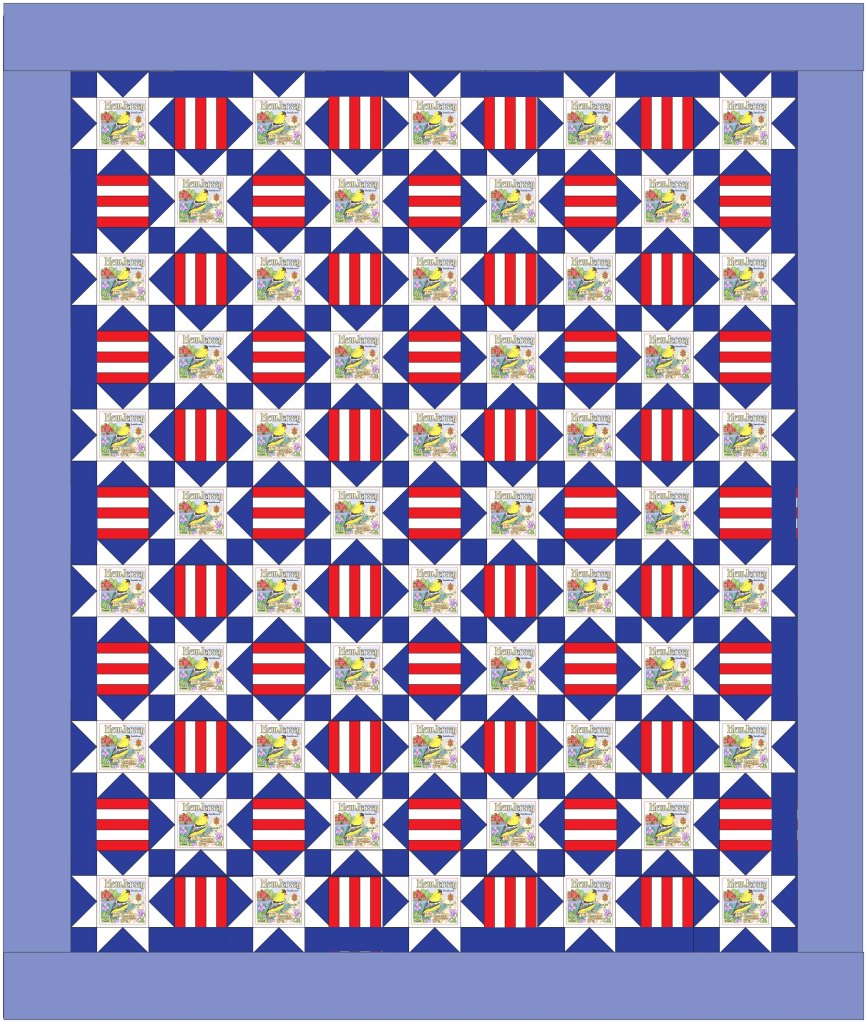
Follow the layout I gave– I am stitching the states in the order they were added to the union, but you might choose alphabetical, or any other order you think of. Just remember on some rows, the red striped blocks are horizontal and some are vertical. I’ll just go ahead and show the layout again, so you can see what I’m talking about.
I am going with a “controlled scrappy” look- by that I mean, my red stripe blocks have just one white print and one red print each, not two different whites and two different reds.

I also want controlled scrappy for my star blocks. So I wanted the same blue fabric for each star, but if you study the layout, the stars all share the corners, so unless you use the same blue fabric for the entire quilt it won’t work.

But wait! I had an idea… I am going to use the same blue fabric for all four star points– then, pick one fabric for all of the cornerstones in the entire quilt. I’ve already ordered a yard of blue for the cornerstones and that is on its way. If this makes no sense to you, I’m going to show my Carefree Highways progress on each block post until it’s finished, so it will become apparent as we go along.
Finally– I’m using fat quarters for my flying geese– it’s what I buy! I starch, so I’m getting twenty-one 3″x 5-1/2″ pieces out of each. That’s five sets of four, and one extra piece to lose. 🙂 You will need sets of four if you are going to keep the same fabrics around each state– just remember that, if you’re working from stash.
I’m really hot on Carefree Highways right now, but I do have to get my leaf quilt ready for the Maine Quilt Show in just a couple of weeks! Here’s my label I’m making– “The Secret of Sugar Meadow” is named for my son-in-law’s discovery of a “sugarbush” on our little homestead farm– hundreds of Sugar Maple trees and how he learned to make syrup from them. The details are too small for machine embroidery, so I’m just using iron-on fabric to do it. I was so proud I found that perfect syrup batik to use for the bottle– then my friend Tere informed me that she gave it to me! Haha. I knew it didn’t look like something I would ever buy.

Next week, I hope to have some finished pictures of it and I’m so hoping if you live near Maine, you’ll be able to see it at the show. Make sure you ask a white glove lady to show you my label!
Have a wonderful week!
xox
Carol

Leave a reply to Linda Sue Cancel reply